ASP.NET Core Swagger Swagger UI Web api API document
▌Introduction
Swagger is a powerful open source framework that helps
you design, build, document the RESTful
APIs. We are going to install Swagger into our web api and create the api
document.
▋Related articles
▌Environment
▋Visual Studio 2015
Update 3
▋Microsoft.AspNetCore.Mvc
1.0.0
▋Swashbuckle.SwaggerGen
6.0.0-beta
▋Swashbuckle.SwaggerUi
6.0.0-beta
▌Implement
▋Install packages
▋Enable XML document output
Enable the XML
documentation file option.

▋Configuration
▋Startup.cs
public void ConfigureServices(IServiceCollection services)
{
#region MVC
#endregion
#region CORS
#endregion
#region Swagger
var basePath = PlatformServices.Default.Application.ApplicationBasePath;
var xmlPath = Path.Combine(basePath, "Angular2.Mvc.Webapi.xml");
//var xmlPath =
Configuration["Swagger:XmlPath"]; //Or set the path in appsettings.json
services.AddSwaggerGen();
services.ConfigureSwaggerGen(options
=>
{
options.SingleApiVersion(new Swashbuckle.Swagger.Model.Info
{
Version = "v1",
Title = "Angular2.Mvc WebApi",
Description = "Angular2.Mvc
WebApi samples",
TermsOfService = "None"
});
options.IncludeXmlComments(xmlPath);
options.DescribeAllEnumsAsStrings();
});
#endregion
}
|
▋Run Web api and
navigate to Swagger UI
Run the Web api application and navigate to the URL :
http://localhost:XXXX/swagger/ui/index.html

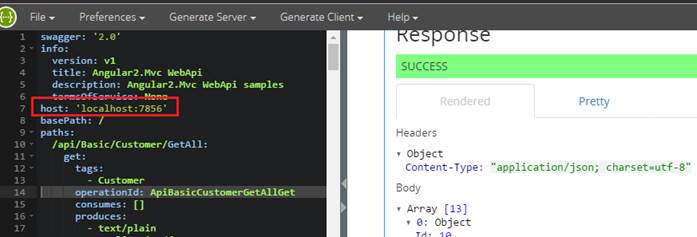
Copy the url on the top of the document and link to it,
you will get a JSON on the browser.

Copy the JSON.


For example, we add the host url for testing the APIs.
host: 'localhost:xxxx'
services.AddCors(options =>
{
options.AddPolicy("AllowSpecificOrigin",
builder =>
builder.WithOrigins("http://localhost:4240", "http://editor.swagger.io")
.WithMethods("HEAD", "GET", "POST", "PUT", "DELETE") //Or AllowAnyMethod()
);
});
|
▋Produces Different Response Type
Swagger also support the different response type on the
document.
Here is a
sample, the Web api method returns DtoError object when there is an InternalServer error(500).
All we have to do the add this line:
[ProducesResponseType(typeof(DtoError), 500)]
[ProducesResponseType(typeof(DtoError), 500)]
▋ApiController
[HttpGet("GetAll")]
[ProducesResponseType(typeof(DtoError), 500)]
public IQueryable<DtoCustomer> GetAll()
{
try
{}
catch (Exception ex)
{
var err = new DtoError
{
StatusCode = 500,
ServerError = ex.Message,
ClientMsg = "Please try
again..."
};
var errJson = JsonConvert.SerializeObject(err);
byte[] data = System.Text.Encoding.UTF8.GetBytes(errJson);
Response.ContentType = "application/json";
Response.StatusCode = (int)HttpStatusCode.InternalServerError;
Response.Body.WriteAsync(data, 0, data.Length);
throw;
}
}
|
And the API document will be updated like this.

▋Generate Client
Here is another powerful function of Swagger Editor. You can choose to
generate the document as HTML, codes… etc, as the reference.

▌Reference
沒有留言:
張貼留言